
2.1. Installing Boro VoD Solution
2.1.1. Introduction
The present chapter describes the preparation of the server and the procedure for self-installation of the Boro VoD Solution Server software.
Prerequisites
Links to download the archive for the Boro VoD Solution Server installation are provided by the Elecard technical support upon request.
It is necessary to unzip the archive directly on the target server with recommended Linux OS. Unzipping the archive in Windows OS and then copying files to Linux OS may lead to negative consequences, such as corrupted symbolic links, corrupted script execute permissions, increased size of the installation package due to copying unnecessary files. With a high probability, the package will become unusable.
Before starting the automatic installation, you need to specify the custom settings in the installation scripts. You should edit the scripts in text editors on the target server that mitigates the risk of adding any unforeseen changes to files content (e.g., replacing spaces with tabulation marks, etc.). Scripts cannot be edited within the Windows OS due to different types of line breaks in Windows and Linux systems.
For the server installation, the Internet access is required. The installation speed depends on the network bandwidth and the CPU. The installation time approximately takes 20-30 minutes.
Access to certain non-default repositories may be required when installing the server. See the Installing the Boro VoD Solution Server section.
2.1.2. Preparing the Server
Selecting a platform
Before the Boro VoD Solution Server installation, an appropriate platform should be chosen. The system characteristics of a platform directly affect the future system performance, as well as the ability to properly receive and process statistical data. Thus, for validating 1000 hours of media files per month, the platform with the following characteristics is required:
CPU: 4 cores, 3 GHz;
RAM: 16 GB;
HDD: 300 GB;
Ethernet: Gbps.
The Server software is being continuously improved, and adding new features increases the system resources utilization. Projects with a large amount of media file validation require a detailed analysis and an individual approach. Contact with the Elecard technical support team to request assistance in the platform selection.
Disk space size
For the correct operation of the Boro VoD Solution Server software and the operating system, at least 300 GB of disk space is required. Additionally, the Boro VoD Solution Server uses a database for aggregation of thumbnails, statistics and other data. We recommend using a separate partition of a hard drive or a partition within a dedicated disk array for the database location. The database size can be significantly large and directly proportional to the data storage depth.
It is estimated that a disk space requires 50 MB per one average media file with 1 hour duration. However, the used storage depends greatly on a thumbnail capture frequency (click to expand):
50 MB - is the minimum disk volume required for analyzing with default settings (capturing thumbnails each 10 seconds);
When thumbnail capture interval reduces to 1 second, the daily volume increases up to 100 MB;
During capturing, thumbnails are saved in the JPEG format and scaled to 128 px in width (number of pixels in height depends on aspect ratio of the original video);
The average size of a single thumbnail equals to 4-5 KB;
Thus, the daily volume required to store thumbnails at a capture frequency of 1 second is 100 MB per one media file.
Statistics for analyzed tasks is stored during 14 days; however, it should be considered that statistics for the current day is accumulated separately. By the end of the day, the total storage depth will reach 15 days until daily data cleanup occurs. In this way, 100 GB of a disk space is the approximate volume for storing results of 1000 media files during 30 days with default analysis settings.
To ensure data storage reliability, we recommend to use RAID 1 disk array.
Traffic
Outbound traffic:
23/UDP — NTP;
25/TCP — protocol for sending e-mails (SMTP);
53/TCP/UDP — DNS.
Inbound traffic:
80/TCP (required) — for communication of the client browser with the server;
8444/TCP (required, default) — for communication of the probe with Boro VoD Solution Server.
The total traffic between the server and the probe:
For the total traffic volume estimation, TBD 50 kbit/s is required for one media file verification task (one video and one audio tracks) To a large extent, the average traffic depends on the thumbnail capture frequency.
Installing Operating System
Boro VoD Solution Server supports:
Rocky Linux 9 (Minimal Install);
AlmaLinux 9 (Minimal Install);
RHEL 9 (Minimal Install).
Attention
Script for installation Boro VoD Solution Server supports the mentioned OS only. It cannot be installed on Windows OS.
When installing the operating system:
it is enough to create a superuser account, all necessary accounts will be created during the automatic installation of the Boro VoD Solution Server application;
if there are no specific requirements, use the
ext4orxfsfilesystem.
To update all installed packages, use the following command:
sudo dnf update
2.1.3. Installing the Boro VoD Solution Server
Prerequisites
Important
The following repositories will be automatically added to the operating system when the installation script is executed:
pgdg — for PostgreSQL [https://download.postgresql.org/pub/repos/yum/reporpms/EL-9-x86_64/pgdg-redhat-repo-latest.noarch.rpm]
epel — for STUN/TURN server (optional) [https://dl.fedoraproject.org/pub/epel/epel-release-latest-9.noarch.rpm]
Installing the Server
Download the installation archive and copy it to the server where you want to install Boro VoD Solution Server. You can download the archive in each preferred folder.
Attention
Do not unzip the archive in Windows OS before copying. This will corrupt symbolic links and script execute permissions. With a high probability, the installation package will become unusable.
Create a temporary folder, install archiving utility
tarand unpack the archive using the following command:TMP_DIR="$(mktemp -d)" sudo dnf install -y tar tar -C "$TMP_DIR" -xf "/PATH/TO/BoroVoDSolution.install_VERSION.DATE.NUM-VoD.tgz"
Open the
"$TMP_DIR"/boro_install_variables.shscript in a text editor and change values for the following variables:SERVER_PUBLIC_NAME=server.boro(required) - a domain name or IP address of a server;If you use proxy for the Internet access, remove comments 1 from the following strings:
# export http_proxy=http://192.168.1.1:3128
# export https_proxy=http://192.168.1.1:3128
DB_DEST_DIR=/home— a path where database (thepgsqlfolder) will be transferred during installation. By default, the database is installed at the./homedirectory. Significant additional disk space is required for storing database (depends on the task number and the data storage depth). If necessary, you can specify another folder for storing database files.Attention
It is not recommended to specify home directories of any other users, since a DBMS will not have the access to files and folders.
You may use the following handy commands to view the partition information:
# Partitions, their sizes, and mount points:
df -T | grep -Ev 'tmpfs|loop|overlay'
# Block devices information:
lsblk -e 7
# export NTP_SERVER=172.16.1.9(optional) - IP address or a domain name of an NTP server for time synchronization via thechronydservice. To add a new server for synchronization, remove a comment and specify an address. You can specify the domain name in the following manner:export NTP_SERVER=server_name,export NTP_SERVER="server_name",export NTP_SERVER='server_name'.Attention
It is important to have the synchronized date and time on a machine for correct operation of Boro VoD Solution. Using an NTP server is a mandatory requirement.
# export INSTALL_TURNSERVER=1- remove a comment from this command to install a STUN/TURN server;# export INSTALL_HASP=1- remove a comment from this command to install HASP security drivers. The use of a USB key as an additional licensing element is agreed upon at the stage of discussing the software delivery. If necessary, these drivers also can be installed after the Boro VoD Solution server installation.# export TIME_ZONE=UTC- the time zone, default is UTC. If necessary, remove a comment from this command and specify a different time zone in the formatexport TIME_ZONE=Dublinorexport TIME_ZONE=Europe/Dublin. To select the appropriate time zone, use list of time zones.
Run the installation script of Boro VoD Solution Server as root:
sudo "$TMP_DIR/install.sh"
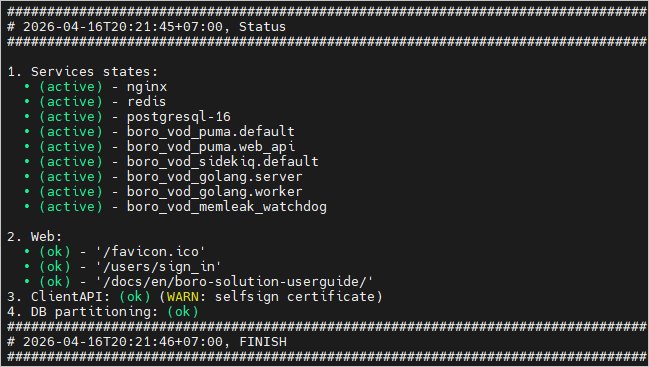
The installation procedure is carried out in several stages. For each stage, the installation progress is displayed. Upon installation completion, you will see the FINISH message and statuses of the installed services:
When the Boro VoD Solution server is installed, installation logs will be saved in the
$TMP_DIR/BoroVoD.install_log.YYYY-MM-DD.UNIX_TIMESTAMP.txt.gzfile. If any issues arise during server installation, send this file to the Elecard technical support team.To delete temporary files created during installation, use the command:
[ "${TMP_DIR#/}" -a -d "$TMP_DIR" ] && sudo rm -rf "$TMP_DIR"
Open in the browser the
http://SERVER_PUBLIC_NAME/users/sign_inwhere instead of SERVER_PUBLIC_NAME enter the public IP or the server domain name specified in theboro_install_variables.shfile. The installed server has the single account by default, use the following credentials to log in the Boro VoD server:admin@admin.com— e-mail of the default useradm1n678— password to log in 2.
- 1
To comment out a line means to add a special character—in our case, the
#symbol—that causes the line to be ignored during execution. To uncomment a line, remove the special character.- 2
Due to security reasons, please change the password on first login. Changing the password is available on the My Account page, for more details see the Change password.
2.1.4. Installing Certificates
The certificates are required for installing the trial or purchased licenses on the server and for establishing an encrypted channel between the probe and the server using the https protocol. To install the license, you need to go through following steps and exchange the certificates with the Elecard technical support team:
Go to the certificates management tab at
http://SERVER_PUBLIC_NAME/admin?tab=certificatesand fill in the following fields to create a CSR certificate:Country — the server location country;
State — the area/region of the country;
City — the city name;
Organization — the organization name;
Department — the department name;
Server hostname or IP — the public IP or domain name of the server for which the certificate should be issued;
Email — the email address of the contact person in the organization.
Fields marked with an asterisk are required.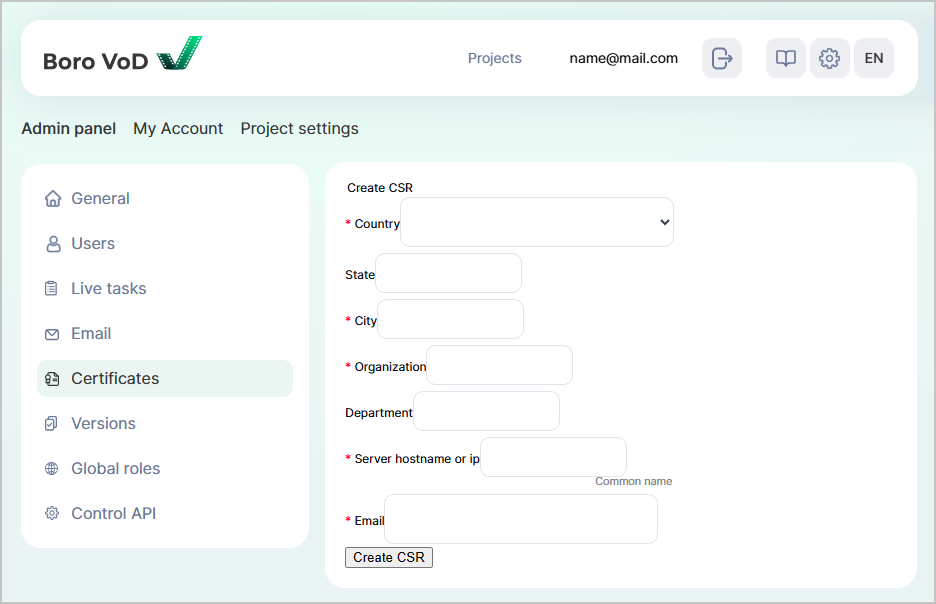 After filling in the fields, click the
 . Send the downloaded certificate to Elecard engineers.
Get the certificates from the Elecard technical support team:
xxxxxxxxxxx.limit.cert.pem (Limit certificate) — stores license limitations, for example test period expiry date, license balance, information for connection to the HASP key, etc.
xxxxxxxxxxx.cert.pem (HTTPS certificate) — serves for encrypting the connection between the probe and the server, as well as protecting the server from connecting to an unlicensed probe and handling unlicensed requests.
Upload the certificates in the corresponding fields and click

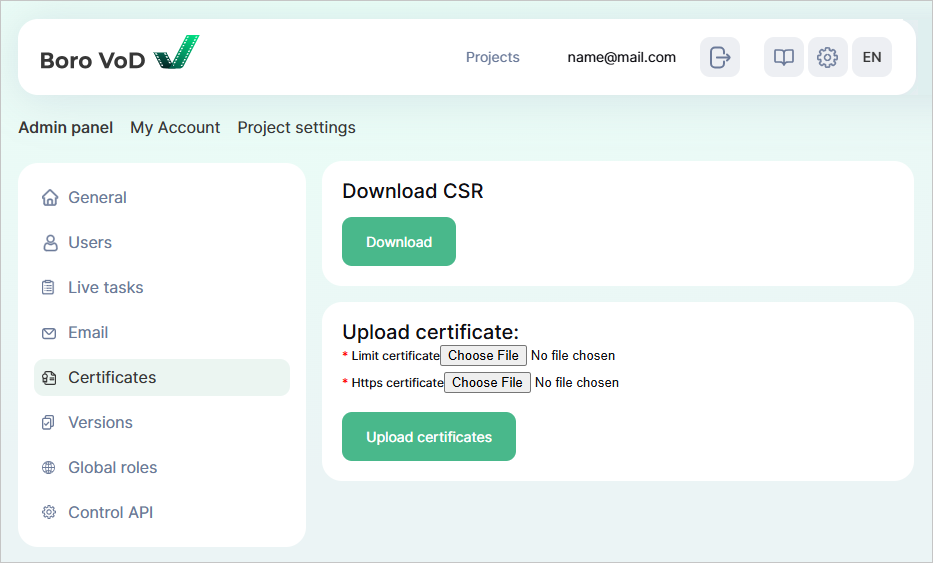
The page will refresh, and the uploaded certificates will take effect. For the installed license, its details and status will display. Open Projects page, license balance will appear in the Product Resources block.
2.1.5. Initial Testing
The initial installation verification is successful login under the default admin@admin.com account.
Secondly, try to run a probe from the different machine.
If any verification procedure fails, please contact with the Elecard technical support team.