
3.3. Dashboard
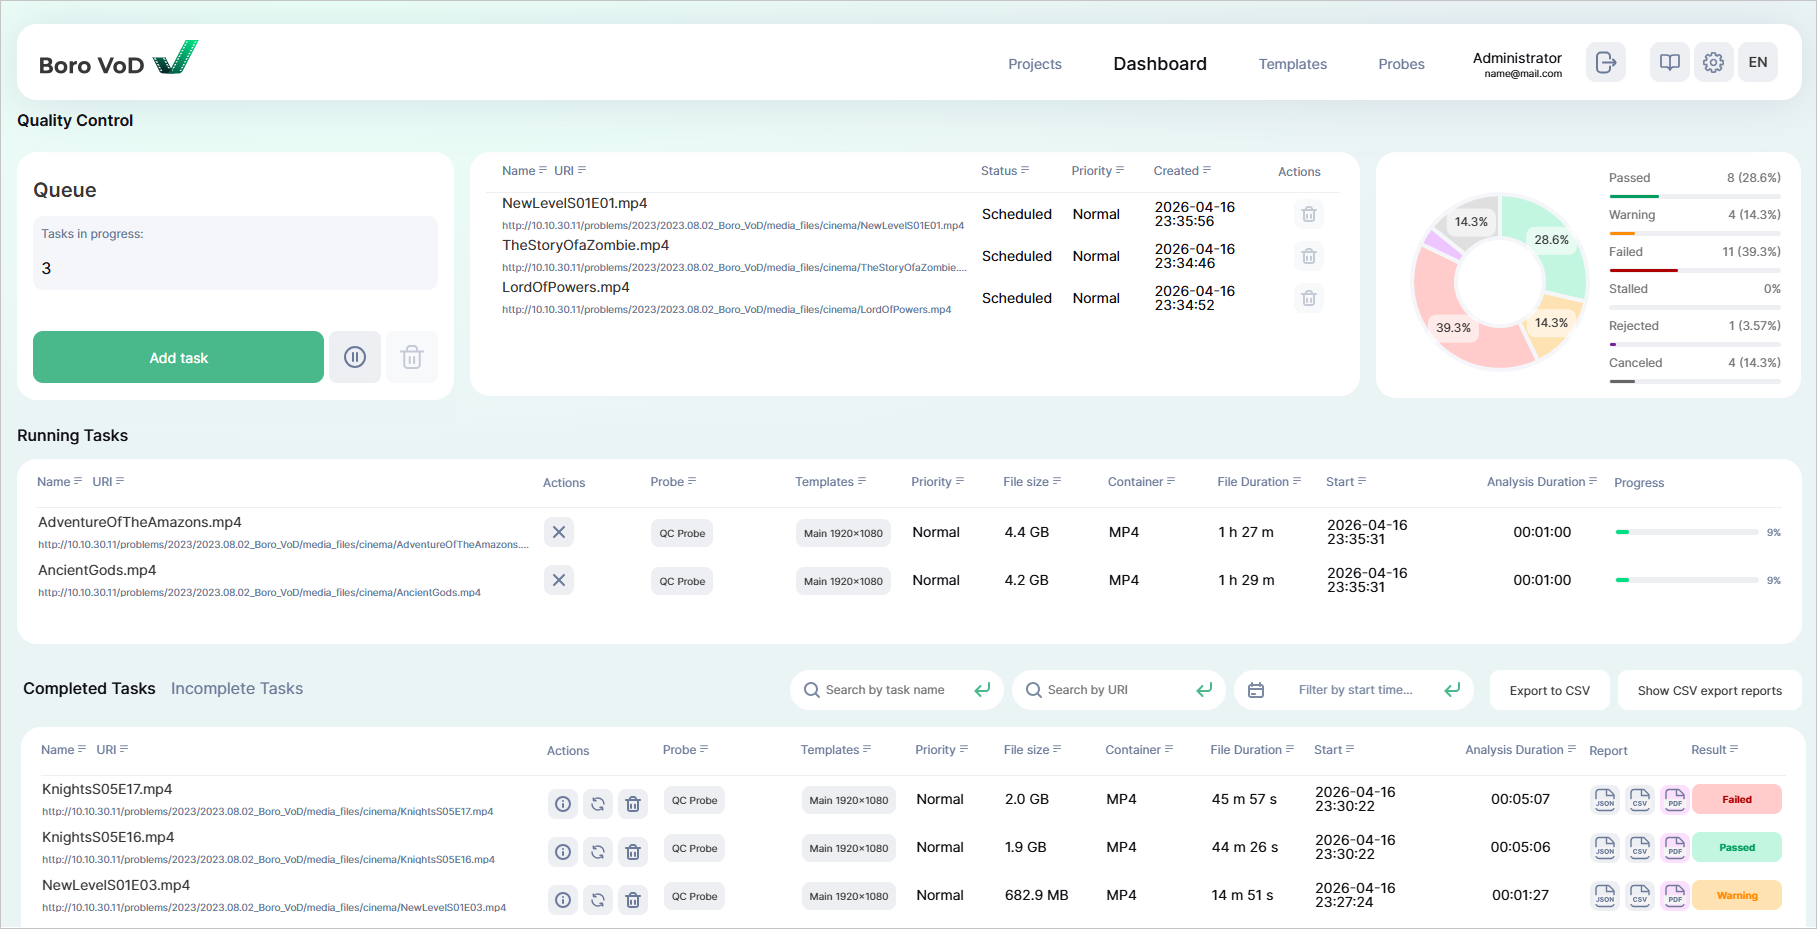
The main page of Boro VoD. On the Dashboard page, you can add validation tasks in queue, see info regarding launched and completed tasks, as well as receive a validation report.
3.3.1. Adding a New Task
To add a new task, click  in the Queue block.
Note
The button might be missing due to:
The project does not have any active probes. See the Probes page to learn about your active probes. The probe launch process is described in the Launching the Probe section;
License certificates have not yet been applied, or the licensed hour package ran out. Current balance displayed on Projects page → in the Product resources block (click for more).
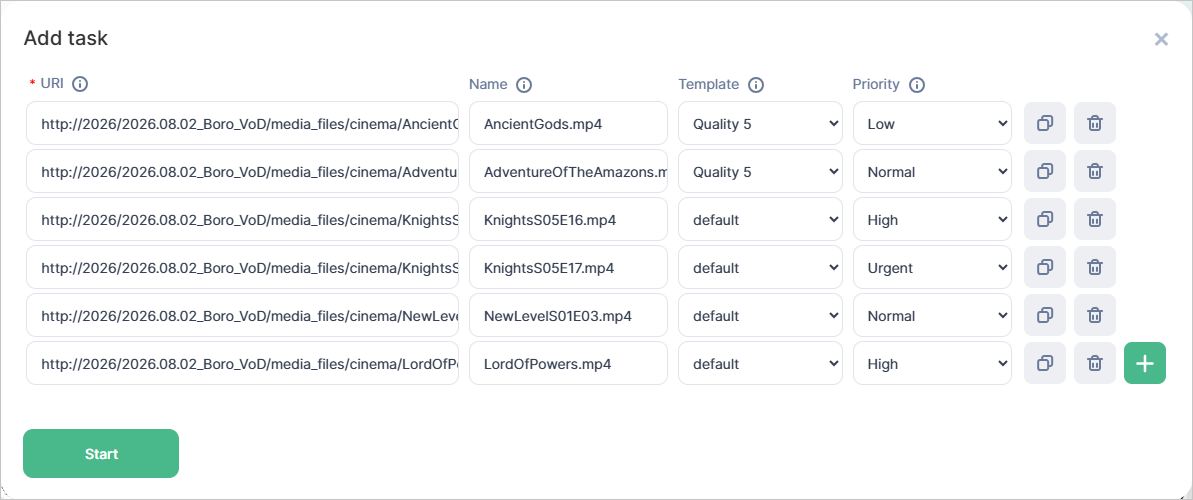
In the pop-up window, fill out the fields and confirm by clicking on  . The fields include:
URI — to-be-validated media file’s location. URI can be specified in two ways:
file://— for media files on a local storage;http://orhttps://— for media files accessed via one of these two protocols.Note
When launching an HTTP/HTTPS task, blank spaces will be automatically replaced with the
%20combination.
Name (optional) — media file validation task’s name. When specifying a name, do not use
"and< >symbols. Upon launching a task, blank spaces and service characters at string’s start and end will be automatically deleted;Template — test template that a media file will be validated against;
Priority (optional) — task’s priority. Load balancer distributes validation tasks between available probes according to the priority order—from
ImmediatetoLow. Priorities include:Low— lowest-priority task. Such task will be the last one in the queue,Normal— regular-priority task. By default, every task gets theNormalpriority,High— high-priority task, queued prior to lower-priority tasks,Urgent— urgent tasks that need to be completed as soon as possible. Queued prior to lower-priority tasks,Immediate— task with the highest priority. Such task is immediately approved for work.Attention
In case the probes’ limit for simultaneously launched tasks is reached, addition of tasks with theImmediatepriority will lead to one of the already launched tasks being canceled. Load balancer will force a lower-priority task out.In case of multiple tasks with the same lower priority, the task with the lower absolute progress will be forced out. Absolute progress is estimated as the product of the task’s progress (in %) by the media files’s total duration (in seconds).The forced-out task will be placed in the Incomplete Tasks block, its result set asCanceled, as well as queued back for redistribution.Let’s take a look at an example
User added a task with the
Immediatepriority, but the probe, having a limit as large as two simultaneously launched analysis tasks, is already busy processing 2 tasks with theNormalpriority:Progress of task А = 39%, the media file’s duration = 4877 seconds, meaning that the absolute progress is 39% × 4877 = 1902 seconds;
Progress of task B = 90%, the media file’s duration is 60 seconds. Absolute progress is 90% × 60 = 54 seconds.
Absolute progress of task B is lower, this task will be forced out.
3.3.2. Statuses and Results
Each task—no matter how added—goes through the stages mentioned below. Each stage corresponds to its specific status:
Scheduled— task is created and queued for launch. You can find the info regarding it in the Queue block. Next, the load balancer will evenly distribute the tasks from queue among the available project’s probes according to priority, then the status will change to one of the below-mentioned;Explore— task sent to probe for look-ahead analysis;Running— task launched, You can find the info regarding it in the Running Tasks block;Completed— task completed and placed in the Completed Tasks block;Canceled— task stopped by user or forced out by the load balancer. Such task will also be placed in the Incomplete tasks block;Rejected— task launch rejected, with task being placed in the Incomplete tasks block. To learn why that happened, see the Dashboard page → Incomplete tasks block. Possible reasons include:Media file’s total duration is 0 seconds or probe failed to define duration,
Media file not found via the specified URI,
Media file fails to follow the test template’s compliance conditions. Inside the test templates’ settings, the
Stop if condition not metoption is enabled for Container Format, Video Format, or Audio Format tests. It can be disabled there,Media file format not supported.
Access to media file validation is temporarily suspended when the license balance fully runs out or its remaining balance is less than the duration of the file submitted for validation. To learn more about the principle of using the license balance, see here.
Stalled— task stopped incorrectly and placed in the Incomplete tasks block. Server stopped obtaining analysis data, but the stop task command was never received. Normally this has to do with the server losing connection with the probe, or with the probe finishing its work incorrectly. In this case, the task will be restarted 3 times (by default). Automatic task restart scenario can be configured in Project settings ➝ Restart Stalled tasks block.
For finished tasks with Completed status, the following validation results apply:
Passed— all template tests were passed successfully. Media file fully meets the requirements,Warning— irregularities detected inWarning-level tests only. Media file can be further used, but it’s best to fix the irregularities;Failed— irregularities detected inError- orFatal-level tests. Media file doesn’t comply with the template’s requirements and needs to be fixed.
Diagram
Diagram presents the distribution of completed (Passed, Warning, Failed) and Incomplete (Canceled, Rejected, Stalled) as a circle diagram for the current 10 days.
3.3.3. Queue
Aside from the button, the block provides the amount of queued tasks as well as a table.
The table contains the list of added tasks, each entry having:
Name — name of task;
URI — location of the analyzed media file;
Status — status of task. In the Queue block, only two statuses apply to tasks:
ScheduledandExplore;Priority — priority of task;
Created — date and time when task was added in the YYYY-MM-DD hh:mm:ss format;
Actions — contains the
 button that, upon clicking, will place the task in the Incomplete tasks block with its status set to
 Canceled. By default, this button can’t be accessed. To access it, first pause the queue by clicking on .
This button will cause the load balancer to stop distributing in-queue tasks among probes.
This is when you will get access to:
.
This button will cause the load balancer to stop distributing in-queue tasks among probes.
This is when you will get access to:- — lets you delete a task,
Clean the queue — clicking will cause a window offering you to delete all tasks in queue to pop up.
To resume the queue, click
 .
Clicking this will resume the operation of the load balancer.
.
Clicking this will resume the operation of the load balancer.
3.3.4. Running Tasks
The block is a table that automatically receives tasks as soon as they start being processed. Each table row corresponds to a single task. The table columns include:
Name — name of task. Clicking the name will redirect you to the task page;
URI — location of media file that’s being validated. Clicking the URI value will copy it to the clipboard and also redirect you to the task page;
Action — contains the
 button. Clicking it will cancel the task and place it in the Incomplete Tasks with its status set as
 Canceled;Probe — name of probe performing the media file validation. Clicking it will navigate to the probe page;
Template — name of test template against which the probe analyzes the media file. Clicking it will navigate to the template page;
Priority — priority of task;
File Size — media file size in B, kB, MB, GB;
Container — media container format;
File Duration — media file duration in the hh:mm:ss format;
Start Time — validation task start date and time in the YYYY-MM-DD hh:mm:ss format;
Analysis Duration — time elapsed since the validation task started in the hh:mm:ss format;
Progress — task completion indicator in %.
3.3.5. Completed Tasks
The block is a table that automatically receives finished validation tasks that have Completed as their statuses.
Each table row corresponds to a single task.
The table columns include:
Name — name of task. Clicking the name will redirect you to the task page;
URI — location of media file that’s being validated. Clicking the URI value will copy it to the clipboard and also redirect you to the task page;
Actions — contains the following buttons:
- — clicking will delete the task-related record,
 — clicking will open the Add task window with pre-filled fields. The user can run the task with the current or changed settings,
 — clicking will open the Media file information window. It displays the main specifics of the audio/video tracks and container.
Probe — name of probe that validated the media file. Clicking it will redirect you to to the probe page;
Template — name of test template against which the probe analyzed the media file. Clicking it will redirect you to the template page;
Priority — priority of task;
File Size — media file size in B, kB, MB, GB;
Container — media container format;
File Duration — media file duration in the hh:mm:ss format;
Start Time — validation task start date and time in the YYYY-MM-DD hh:mm:ss format;
Analysis Duration — validation task duration in the hh:mm:ss format;
Report — report is automatically generated for completed tasks in one of three formats:
JSON,CSV, orPDF(set by default). The default format can be changed in Project settings ➝ Generate a report block. Each format is represented by a dedicated button:For the default format — clicking once will start the download of the archive with the report,
For the other formats — clicking once will start the report generation process (progress indicator will be displayed), the second click will download the archive with the generated report inside.
Result — media file validation result:
Passed,Warning, orFailed:Passed— all template tests were passed successfully. Media file fully meets the requirements,Warning— irregularities detected inWarning-level tests only. Media file can be further used, but it’s best to fix the irregularities,Failed— irregularities detected inError- orFatal-level tests. Media file doesn’t comply with the template’s requirements and needs to be fixed.
3.3.6. Incomplete Tasks
Canceled, Rejected, or Stalled.Attention
The system does not generate reports in JSON, CSV, or PDF formats for incomplete tasks!
Each table row corresponds to a single task. The table columns include:
Name — name of task. Clicking the name will redirect you to the task page;
URI — location of media file that’s being validated. Clicking the URI value will copy it to the clipboard and also redirect you to the task page;
Actions — contains the following buttons:
- — clicking will delete the task-related record,
- — clicking will open the Add task window with pre-filled fields. The user can run the task with the current or changed settings.
Probe — name of probe that validated the media file. Clicking it will redirect you to to the probe page;
Template — name of test template against which the probe analyzed the media file. Clicking it will redirect you to the template page;
Priority — priority of task;
File Size (if the value was obtained) — media file size in B, kB, MB, GB;
Container (if the value was obtained) — media container format;
File Duration (if the value was obtained) — media file duration in the hh:mm:ss format;
Start Time — validation task start date and time in the YYYY-MM-DD hh:mm:ss format;
Analysis Duration — validation task duration in the hh:mm:ss format;
Info — reason why the task was not completed;
Status — can be:
Canceled,Rejected, orStalled.